

How To Change Monitor Refresh Rate Windows 7

Refresh Charge per unit is the number of frames per second your monitor tin can display, in short, it's the number of times your monitor updates with new information every 2nd. The measurement unit of refresh charge per unit is hertz, and using high refresh charge per unit will actually make text clearer or visible on display. Using a depression refresh charge per unit volition make the text and icons on display blurry, which volition strain your eyes and requite yous headaches.
If you're facing issues such as screen flickering or finish-motion effect while playing games or but using whatever graphic intensive software, and so in that location is a chance that it'due south associated with your Monitor Refresh Rate. Now consider if your monitor's refresh charge per unit is 60Hz (Which is the default for laptops), then it means that your monitor can update the sixty frames per second, which is very adept.
If your Refresh Rate for a display is set lower than 60Hz, yous need to make sure t gear up it to 60Hz to avert any problems you might or might non face up depending upon your usage. In older versions of Windows, it was easier to Modify Monitor Refresh Rate equally it was located inside Control Panel, but with Windows 10 you demand to practice everything inside Settings App. Anyway, without wasting any time, permit'southward see How to Modify Monitor Refresh Rate in Windows 10 with the assistance of the beneath-listed tutorial.
How to Change Monitor Refresh Rate in Windows ten
Make certain to create a restore point but in case something goes wrong.
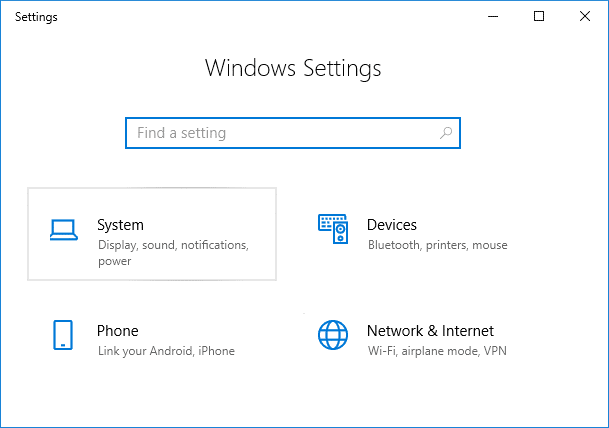
1. Press Windows Key + I to open Settings then click on System.
2. From the left-hand carte du jour, make sure to select Display.
iii. Now ringlet down to lesser then click on "Avant-garde brandish settings".

Note: If you accept more than one display connected to your PC, make sure to select the display you want to change the Refresh Charge per unit. Starting with Windows build 17063, y'all can skip this step and directly go to below one.
4. Next, here y'all would see all the display connected to your PC and their complete information, including the Refresh Rate.
5. Once you are sure of the display for which yous want to change Refresh Rate, click on "Brandish adapter properties for Display #" link below the display information.

vi. In the window which opens the switch to the Monitor tab.

vii. Now nether Monitor Settings, select the Screen Refresh Rate from the drib-down.

8. Click Apply, followed by OK to save changes.
Note: You lot will have 15 seconds to select Proceed Changes or Revert before it automatically reverts to the previous screen refresh rate or brandish mode.

nine. If y'all want to select a Display Style with Screen Refresh Rate, y'all need to again click on the "Display adapter properties for Display #" link.
ten. At present under Adapter tab, click on "List All Modes" button at the bottom.

11. Select a Display mode according to the screen resolution and screen rate according to your specifications and click OK.

12.If you're satisfied with the current refresh charge per unit or display style, click Go along changes otherwise click on Revert.
13. Once finished close everything and restarted your PC.
Recommended:
- Enable or Disable Write Protection for Disk in Windows 10
- Set up Disk Quota Limit and Warning Level in Windows x
- Enable or Disable Disk Write Caching in Windows x
- Forbid Hard Disk from going to Slumber in Windows 10
That's it y'all have successfully learned How to Modify Monitor Refresh Charge per unit in Windows 10 but if you lot still take whatsoever questions regarding this tutorial then feel complimentary to ask them in the annotate'southward section.

How To Change Monitor Refresh Rate Windows 7,
Source: https://techcult.com/how-to-change-monitor-refresh-rate-in-windows-10/
Posted by: gloverweld1948.blogspot.com
0 Response to "How To Change Monitor Refresh Rate Windows 7"
Post a Comment