

How To Make A Simple Local Database App In Visual Studio 2017
Configuring and creating angular apps with Visual Studio is not straightforward as it requires some manual configuration settings and some addition of .config files. It would be nice to have a ready-made template which would take this pain away and save the time. With Visual Studio 2017, a template is available for creating and running sample Angular application. The template is good enough to get you started with Angular. This post talks about how to create an Angular 4 App with Visual Studio 2017 and how to extend it with a simple example.
How to create an Angular 4 app with Visual Studio 2017
Update: Angular 5 is out and if you are looking for Angular 5 app, then visit
here.
Let's first set up the required software. You must install following software (if not installed).
- Node.js
- .NET Core 2.0
- Visual Studio 2017 Community. If already installed, then update it to version 15.4.2.
Open Visual Studio 2017. Hit File->New Project -> Select ASP.NET Core Web Application. Enter the project name and select the path where you wish to create this project. When you hit "OK", you should see the following dialog box.
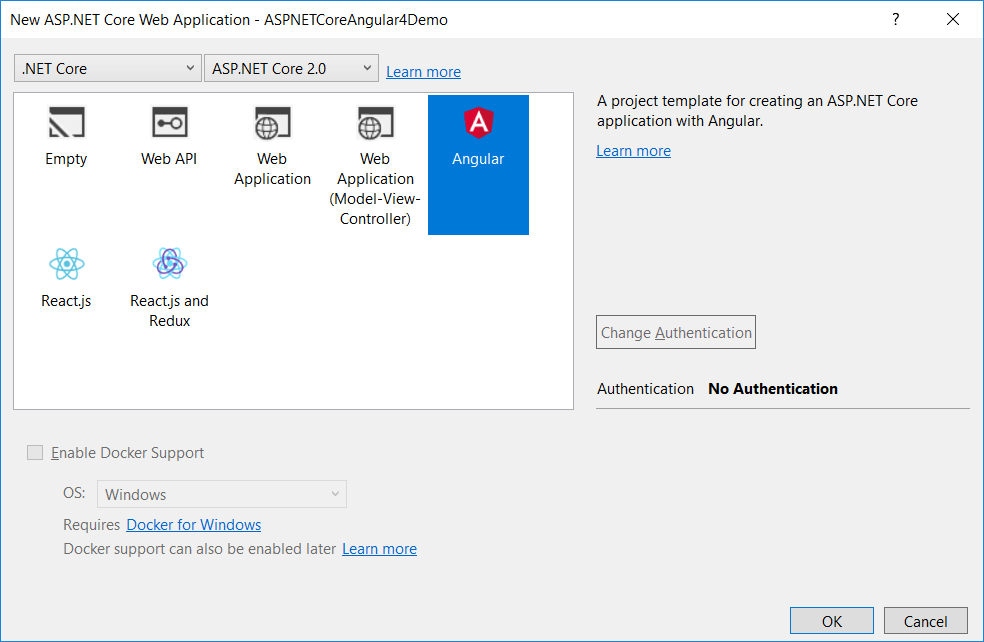
Select Angular from this dialog and Say "OK". The Visual Studio will create an ASP.NET Core 2.0 based project with Angular 4 configured. You should see the following project structure.
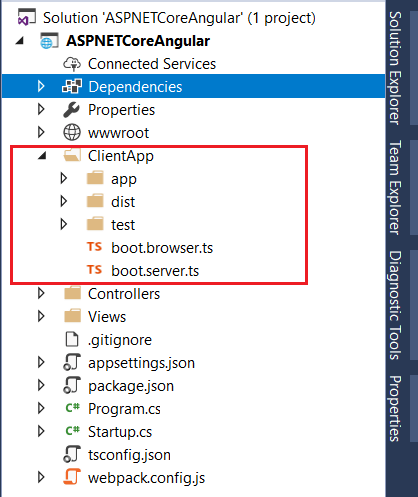
The project structure looks familiar with Controller, Views and wwwroot folder. The ClientApp folder contains the angular app. You can also see webpack.config.js at the root of the application, which tells you that webpack is being used by this project as module bundler. This file instructs webpack about how to bundle the client code.
If you want to learn all of Angular, I want to personally recommend ng-book as the single-best resource out there. You can get a copy here.
Before, diving into the sample code, it's important to highlight a few things. This sample code uses JavaScriptServices used for creating single page applications with ASP.NET Core. JavaScriptServices is a collection of client-side technologies for ASP.NET Core. Its goal is to position ASP.NET Core as developers' preferred server-side platform for building SPAs. It includes support for the client-side frameworks – Angular, Aurelia, Knockout.js, React, React + Redux, and Vue.js.
Meet JavaScriptServices
This service comprises three distinct NuGet packages:
- Microsoft.AspNetCore.NodeServices (NodeServices): It allows you to execute JavaScript on the server within a Node.js environment. You can even consume NPM packages at runtime within your .NET Core application.
- Microsoft.AspNetCore.SpaServices (SpaServices): It offers a server-side platform to create for building SPAs. It has the necessary tools to handle server-side prerendering, webpack middleware support, Hot Module Replacement and routing helper to sync client-side routes with server-side route.
- Microsoft.AspNetCore.SpaTemplates (SpaTemplates): It offers single page application templates for ASP.NET Core.
All these packages are already included as they are part of single Microsoft.AspNetCore.All package. This single meta package was introduced in ASP.NET Core 2.0.
You should read this official post to learn more about JavaScriptServices.
Let's visit some important lines of code to get a feeling how all this works. First, open Startup.cs and look at configure() method code. There are a couple of things to notice. First,
app.UseWebpackDevMiddleware(new WebpackDevMiddlewareOptions { HotModuleReplacement = true }); The above code registers WebpackDevMiddleware into the HTTP request pipeline. As you know, webpack is a module bundler and used to build and bundle client-side resources. Normally, one would run the webpack at the command-line to bundle things, however, with this middleware this whole process is automated and you don't have to worry now. Here, HotModuleReplacement option is also set to true.
"Hot Module Replacement" (HMR) is a feature to inject updated modules into the active runtime. So any changes made into the client side will get reflected instantly in the browser without even restarting the application or refreshing the browser.
The next piece of code is related to routing. We all are familiar with MapRoute() to configure routing for ASP.NET Core MVC based application. The new thing here is, MapSpaFallbackRoute(). This is required to handle client-side routing. If the request doesn't match any static files and MVC controller, then it is meant for client-side app (not always though). In other words, this enables the server to handle any requests intended for the Angular router by returning the Angular application to the browser. Once the application is loaded in the browser, Angular takes over the URL routing.
app.UseStaticFiles(); app.UseMvc(routes => { routes.MapRoute( name: "default", template: "{controller=Home}/{action=Index}/{id?}"); routes.MapSpaFallbackRoute( name: "spa-fallback", defaults: new { controller = "Home", action = "Index" }); }); Here,MapSpaFallbackRoute also specifies Index of HomeController like the MapRoute(). Both of them seem to be doing the same thing. Then what's the difference here. Well, the MapRoute() defines the default route for MVC application and the MapSpaFallbackRoute always points to the HomeController.
Next, open index.cshtml present in the Home folder. You should see the following line of code.
<app asp-prerender-module="ClientApp/dist/main-server">Loading...</app>
The asp-prerender-module tag helper is used to define which module to render (in this case ClientApp/dist/main-server). This enables server-side pre-rendering of client SPA applications. You should see main-server.js file at the ClientApp/dist location. This file is an entry point to the angular app and gets executed by Node.js. It is used to render the JS on the server before injecting it into the response.
Webpack defines an entry point alias of main-server with value "ClientApp/boot-server.ts" file. You can find this webpack.config.js. The boot-server.ts has createServerRenderer function to configure server-side rendering and returning the HTML markup to the browser. You can check the Angular version in package.json file. In this case it is pointing to 4.2.5.
"@angular/core": "4.2.5",
Lets run the application and you should see the following in your browser.
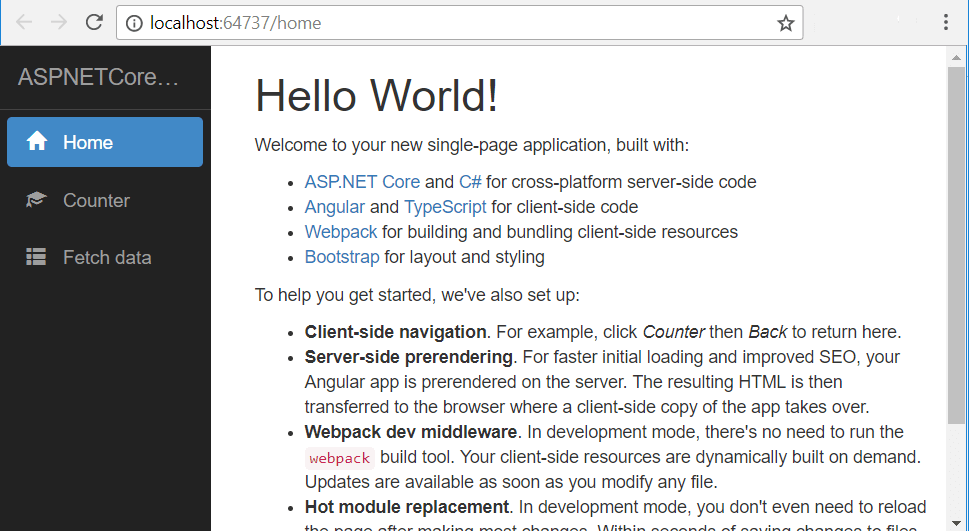
You can double-check the menu items with the angular app structure. Let's extend this application a bit. Here, the fetch data component calls an API to get random weather forecasts. Like,
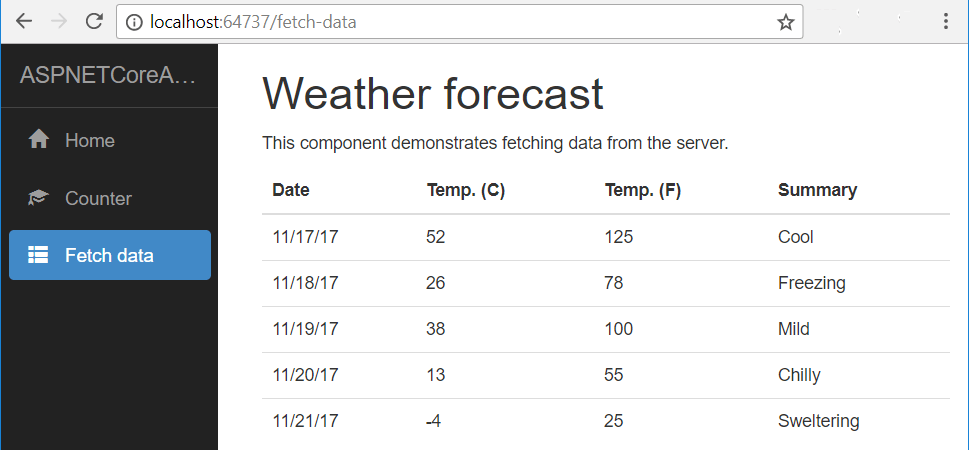
Earlier, I posted Bind Select DropDown List in Angular 2 and let's add a dropdown on top of the grid to filter the data based on the selected value. Below is the API code to return summary list and weather forecasts. The new API added to the sample code is GetSummaries()
private static string[] Summaries = new[] { "Freezing", "Bracing", "Chilly", "Cool", "Mild", "Warm", "Balmy", "Hot", "Sweltering", "Scorching" }; [HttpGet("[action]")] public string[] GetSummaries() { return Summaries; } Next is the updated code of fetchdata.component.ts. The constructor now calls the GetSummaries, along with WeatherForecasts API. There is also a method defined filterForeCasts which gets called on change event of the dropdown. This method filters the forecasts list based on the selected value and then returns the result.
import { Component, Inject } from '@angular/core'; import { Http } from '@angular/http'; @Component({ selector: 'fetchdata', templateUrl: './fetchdata.component.html' }) export class FetchDataComponent { public forecasts: WeatherForecast[]; public cacheForecasts: WeatherForecast[]; public summaries: any[]; constructor(http: Http, @Inject('BASE_URL') baseUrl: string) { http.get(baseUrl + 'api/SampleData/WeatherForecasts').subscribe(result => { this.forecasts = result.json() as WeatherForecast[]; this.cacheForecasts = this.forecasts; }, error => console.error(error)); http.get(baseUrl + 'api/SampleData/GetSummaries').subscribe(result => { this.summaries = result.json() as any[]; }, error => console.error(error)); } filterForeCasts(filterVal: any) { if (filterVal == "0") this.forecasts = this.cacheForecasts; else this.forecasts = this.cacheForecasts.filter((item) => item.summary == filterVal); } } interface WeatherForecast { dateFormatted: string; temperatureC: number; temperatureF: number; summary: string; } interface Summary { name: string; } Lastly, put this HTML in fetchdata.component.html to show the summary dropdown.
<div> <label>Summary: </label> <select (change)="filterForeCasts($event.target.value)"> <option value="0">--All--</option> <option *ngFor="let summary of summaries" value={{summary}}> {{summary}} </option> </select> </div> Run the application and navigate to fetch data. You should see a drodown having list of all the summaries. Changing the selection will also update the weather forecast grid.
This Angular 4 app is upgraded to Angular 5. Read how to Upgrade Angular 4 app to Angular 5 with Visual Studio 2017. You can now also create Angular 5 app directly, Read Create an Angular 5 app in 5 steps using dotnet cli
Conclusion
This is a whole new web development experience with ASP.NET Core and Angular. This is backed by ASP.NET Core JavaScriptServices and Webpack for bundling. Rendering Angular on the server has advantages like better performance, optimized SEO and fast and safe delivery of the content to the browser. This post talks about different nuget packages of JavaScriptServices and how angular application pre-renders on the server. The WebpackDevMiddleware and HMR inclusion is also great as it makes the webpack process automated.
Thank you for reading. Keep visiting this blog and share this in your network. Please put your thoughts and feedback in the comments section.
PS: If you found this content valuable and want to return the favour, then 
How To Make A Simple Local Database App In Visual Studio 2017
Source: https://www.talkingdotnet.com/how-to-create-an-angular-4-app-with-visual-studio-2017/
Posted by: gloverweld1948.blogspot.com
0 Response to "How To Make A Simple Local Database App In Visual Studio 2017"
Post a Comment